1. Project Overview
1.1 Design Basis
1.1.1 Customer Workpiece Technical Data
Workpiece Name: Gas Cylinder
Maximum Workpiece Range (MAX): Steel pipe diameter 203 to 279 mm, length 0.5 to 1.8 meters
Steel pipe diameter 316 to 426 mm, length 0.8 to 2 meters
1.1.2 Standards and Specifications
This Brinell hardness testing machine strictly adheres to the relevant national technical standards and safety regulations regarding the "Brinell Hardness Test Method," "Special Equipment Production and Filling Unit Licensing Rules," and "Gas Cylinder Safety Technical Regulations." It meets the requirements for online hardness testing of gas cylinders and is used for Brinell hardness testing of heat-treated gas cylinders.
GB/T 231.1-2018 Metallic Materials—Brinell Hardness Test—Part 1: Test Method
GB/T 231.2-2012 Metallic Materials—Brinell Hardness Test—Part 2: Verification and Calibration of Hardness Testers
GB/T 231.3-2012 Metallic Materials—Brinell Hardness Test—Part 3: Calibration of Standard Hardness BlocksISO 6506-1:2014 Metallic materials - Brinell hardness test – Part 1: Test method
ISO 6506-2:2017 Metallic materials - Brinell hardness test – Part 2: Verification and calibration of testing machines
ISO 6506-3:2014 Metallic materials - Brinell hardness test – Part 3: Calibration of reference blocks
ASTM E10-18 Standard Test Method for Brinell Hardness of Metallic Materials
GB/T 5099.1-2017 Steel Seamless Gas Cylinders - Part 1: Steel Cylinders with a Tensile Strength Less than 1100 MPa After Quenching and Tempering
ISO 9809-1 Gas Cylinders - Refillable Seamless Steel Gas Cylinders – Design, Construction, and Testing
TSG 07-2019 "Regulations for the Licensing of Special Equipment Production and Filling Units"
TSG 23-2021 "Safety Technical Regulations for Gas Cylinders"
1.1.3 Main Technical Performance Specifications
Test Force (kgf): 187.5, 250, 500, 750
Ball Indenter: 2.5mm, 5mm tungsten carbide alloy balls
Test Force Accuracy: 0.5%
Spindle Travel Distance: 25mm
Spindle Displacement Measurement Accuracy: Better than ≤±1%
Spindle Travel Speed: Maximum: 2.5mm/s
F1 Loading Time (s): Adjustable from 2 to 8 seconds
Hardness value repeatability and indication error:
| Standard test blocks HBW | Maximum allowable repeatability R (%) | Maximum allowable error E (%) |
1 | HBW<125 | 3 | 3 |
2 | 125<HBW<225 | 2.5 | 3 |
3 | HBW>225 | 2 | 3 |
 Equipment operating noise: ≤80dBA
Power supply: AC380V/AC ±10%; 50% ±2%
2. Solution Introduction
2.1 Solution Description
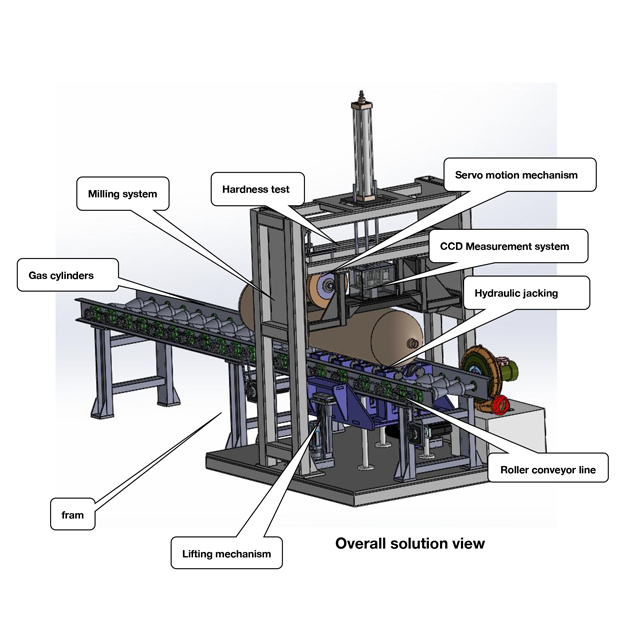
The online Brinell hardness testing system for gas cylinders primarily includes the following equipment: a rack system, a Brinell hardness loading system, a precision CMOS optical measurement system, a milling system, a servo motion system, a V-type roller line, a lifting and clamping system, and an electrical control system.

Rendering of the Brinell Hardness Tester Online Testing Workstation (for reference, subject to actual design).
The above layout and dimensions are for reference only. Specific details are subject to the final design.
3 Main Functions
The intelligent testing system, based on automation technology, enables automated, high-precision, and efficient testing. Key functions include the following:
3.1 Automatic detection of gas cylinder position, transport, and clamping;
3.2 Automatic milling of the surface to be tested;
3.3 Pressure Loading: The hardness measurement unit features closed-loop control of hardness testing. The hardness measuring head, equipped with a built-in drive, independently applies, maintains, and releases force, ensuring the test force is precisely maintained at the specified value.
3.4 Indentation Measurement: The hardness measuring head incorporates an indentation probe that automatically measures the indentation diameter after indentation, directly providing the Brinell hardness value.
3.5 Acceptance Determination: The system allows for pre-entry of the upper and lower hardness limits, automatically determining whether the workpiece has passed the test.
3.6 Data Communication: The system features data communication, allowing measurement data to be transmitted to the central control system via wired communication. Two communication protocols are supported: a machine trigger protocol and a machine communication protocol, both of which are defined separately.
3.7 Metrological Traceability: The system's main metrological parameters are traceable to national standards.
3.8 Parameter Setting: The operator can set or adjust the system's operating parameters as needed.
3.9 Parameter Calibration: The equipment's test force, hardness, and indentation values can be verified on-site, and measurement deviations can be corrected on-site.
3.10 Manual Commissioning: The system features a manual measurement function. This function can be activated during commissioning, maintenance, and parameter setting.
3.11 Automatic Shutdown: The system automatically shuts down if a test anomaly occurs, preventing damage.
3.12 Emergency Shutdown: The system is equipped with an emergency stop switch. In the event of any abnormality, the operator can immediately press the emergency stop switch to cut off power to the equipment, ensuring the safety of both equipment and personnel.
3.13 Equipment Status Indicator: The hardness tester is equipped with an operating status indicator to indicate the equipment's status.
4 Workflow
The workflow is as follows:
① Based on the gas cylinder specifications, create the sample information in the host computer software, select the test method, and press the start button;
② When the corresponding sensor switch on the conveyor line detects the gas cylinder, the conveyor motor stops;
③ The lifting mechanism raises, and the gas cylinder rises to the trigger sensor, whereupon the system automatically clamps the gas cylinder;
④ The milling motor starts, and the servo motion mechanism begins operating, completing the plane milling process;
⑤ The servo motion mechanism moves the hardness loading unit over the gas cylinder, activating the hardness loading system and loading.
⑥ The servo motion mechanism moves the CMOS optical measurement system over the workpiece. The CMOS lens descends, takes a picture, and automatically calculates the Brinell hardness value. The CMOS lens ascends, the servo motion mechanism returns to its initial position, the lifting mechanism descends, and the gas cylinder lands on the conveyor line.
The conveyor line motor starts, and the gas cylinder is delivered to the customer's conveyor line.
5 Equipment List
Scope of supply:
Item No. | Name | Models and specifications | Quantity (sets) |
1 | rack system | frame |
| 1 |
Sealing plate and accessories | 1 |
2 | Loading System | force sensor | 30KN | 1 |
Servo cylinder | 750W | 1 |
Indenter | Diameter 2.5mm,5mm | 1 |
3 | Milling system | motor | 2.2KW | 1 |
milling cutter |
| 1 |
Clamping mechanism |
| 1 |
4 | Servo motion system | servo motor | 1KW | 1 |
Slide rails |
|
|
Lead Screw |
| 1 |
sliding bed |
| 1 |
5 | Precision CMOS Optical Measurement System | CMOS Optical measuring mechanism | 1.3 M pixel |
|
cylinder |
| 1 |
Slide rails |
|
|
6 | Roller conveyor line | motor | 200W | 1 |
roller |
| 1 |
frame |
| 1 |
7 | Lifting and clamping system | hydraulic system |
| 1 |
Linear bearings |
| 1 |
Structural parts |
| 1 |
8 | Electrical control system | computer |
| 1 |
PLC |
| 1 |
Low-voltage electrical components | Contactors, relays, etc. | 1 |
9 | Photoelectric switch |
| 1 |
Scope of Supply:
▲ Compressed air 0.5-0.7 MPa;
▲ Customer site preparation: foundation, primary power supply, etc.;
▲ On-site labor (excluding engineering and technical support);
▲ Installation tools: jacking jack, overhead crane;
▲ Other products and services not included in the scope of supply;
6. Equipment Description
6.1 Frame System
The frame system primarily consists of a base, gantry, and accessories. It is welded and assembled from high-strength structural steel. After welding, it undergoes a heat aging treatment to eliminate welding stress and ensure structural stability. Key assembly surfaces of the gantry are precision machined to ensure assembly accuracy. The lower surface of the gantry crossbeam serves as the generatrix positioning surface on the cylinder's cylindrical surface, ensuring precise cylinder positioning and eliminating the effects of cylinder diameter tolerances.
6.2 Hardness Testing System
The hardness testing system consists of a servo electric cylinder, a force sensor, and an indenter. The force sensor detects the load value, and a PLC controls the servo motor for highly sensitive motion control, ensuring accurate test loads and enabling high-precision hardness measurements.
6.3 Milling System
The milling system primarily consists of a motor, a clamping mechanism, and a milling cutter. The motor drives the milling cutter at high speed, while the servo motion system controls the milling cutter's feed motion, enabling milling operations at predetermined cylinder locations. This provides a high-quality working surface for hardness testing and measurement.
6.4 Servo Motion System
The servo motion system primarily consists of a servo motor, ball screw, and slide rails. The PLC controls the servo motor, which drives the screw's rotation, which in turn drives the slide's lateral movement. This system enables high-precision motion control and positioning for milling systems, hardness testing systems, and optical measurement systems.
6.5 Precision CMOS Optical Measurement System
The precision CMOS optical measurement system primarily consists of a CMOS optical measurement mechanism, a pneumatic cylinder, and slide rails. The pneumatic cylinder controls the lifting and lowering of the CMOS lens, ensuring a precise distance between the lens and the workpiece test surface, thereby guaranteeing measurement accuracy.
6.6 Roller Conveyor Line
The roller conveyor line primarily consists of a conveyor frame, a motor, a V-shaped double-sprocket roller, and a drive chain. The motor drives the rollers to rotate, conveying gas cylinders. Multiple photoelectric detection switches are installed on the conveyor line to detect gas cylinders of different sizes, ensuring that each cylinder precisely stops at the measurement station.
6.7 Lifting and Clamping System
The lifting and clamping system primarily consists of a hydraulic cylinder, linear bearings, and clamping components. Once the gas cylinder reaches the designated position, the hydraulic cylinder rises, lifting the cylinder to the bottom surface of the gantry. This achieves three-dimensional positioning of the cylinder, ensuring accurate and secure clamping.
